


Graham Quince
-
Posts
2,046 -
Joined
-
Last visited
Posts posted by Graham Quince
-
-
@C Wilson - yeah unfortunately no Frog Tags, but that's partly why I created the Data-to-Form widget, so we could get that functionality from Frog3 back.
-
I think CSS is probably the way to go. If you add the subject headings to the table cells as a class, you should be able to hide them, something like:
$.each(data, function(index1, datum) {
    var subjectClass= index1.replace(' ','');
    if (index == 0) {
        myDataDiv.find('.hwheading').append('<th class="'+subjectClass+'">'+index1+'</th>');
    }
    if (datum) {
        myDataDiv.find('.row'+index).append('<td class="pastel_'+index1+' '+subjectClass+'">'+datum+'</td>');
    }
Alternatively, you should be able to add an option into the If statement to determine if it should draw the heading and cell:
                if (index == 0 && datum) {
                    myDataDiv.find('.hwheading').append('<th class="'+index1+'">'+index1+'</th>');
                }
                if (datum) {
                    myDataDiv.find('.row'+index).append('<td class="pastel_'+index1+'">'+datum+'</td>');
                }
-
This is a tricky one - I've checked but we would not provide any configurations as it can cause issues if not done correctly. Our advice is to leave Frog as it is, with ports 80 and 443 open directly to the server. Without these, we cannot provide support or updates.
-
Try this, on the site in an HTML widget:
<style>
  .modal {
    width: 90% !important;
    left: 20% !important;

  }

</style>
-
 1
1
-
-
Here's a much neater, combined version both for students (and for staff to use with the user picker widget):
<style>
    .my_data {
        border-radius: 6px;
        border: 1px solid #cccccc;
        padding: 10px;
        text-align: left;
        font-size: 19px;
        line-height: 25px;
    }

</style>

<div class="my_data"></div>

<script>
var myDataDiv = arguments[0].find('.my_data');
var FORM_UUID = 'FORM_UUID';
var USER_FIELD_UUID = 'USER_FIELD_UUID'; // Field value for the User ID, you may need to check the Developer console to confirm this UUID
var user = FrogOS.getUser();

function getEntries(userUUID) {
    myDataDiv.empty();

    var apiData = {
        content_uuid: FORM_UUID,
        current_user_only: false,
        form_uuid: FORM_UUID,
        limit: '5',
        module: 'form',
        offset: '0',
        sort_dir: 'DESC',
        sort_field: 'date'
    };

    if (user.profile.name == 'Staff' || user.profile.name == 'Admin') {
        apiData.filters = [{
            field_name: USER_FIELD_UUID,
            value: userUUID
        }];
    }

    Frog.Model.api(
        'dataviewer.gettable',
        apiData
    ).done(function(response) {
        var personalData = response.data;
        $.each(personalData, function(index, entry) {
            var data = entry.fields[1].responses[0].response;
            data = JSON.parse(data);

            $.each(data, function(index, datum) {
                if (datum) {
                    //  if (index == "Score" || index == "Grade") { // should you wish to only return some fields
                    myDataDiv.append(
                        index+
                        ': '+
                        datum+
                        '<BR>'
                    )                   // }
                }
            }) // end of data $.each
        }); // end of personalData $.each
    }).fail(function(e) {
        // Report Error
        console.log("failed to load data");
    });

};

getEntries(user.uuid);

$('div[data-content-uuid="75BD91D02002887198A0CF29FBAE2E0C598CBA9CDECD6026"]').on('broadcast.selectedUser',function(el, ev) {
    var user_uuid = ev.model.uuid;
    getEntries(user_uuid);
});


</script>
-
I thought you used @pconkie's version which didn't require dates.
-
When you say Progress Reports, are these through SIMS Linked Documents or elsewhere?
-
This widget uses the similar APIs - It's calling for an awful lot of data (every assignment for every student) and I suspect it would crash too.
-
 1
1
-
 1
1
-
-
Hi @deanmoulder
I think it's likely Microsoft have introduced a change. Joy. I do know that the maximum any file can have an open link is 12 months. Could that time have expired? We're probably going to need to look at it together. Drop me an email and we can book in a call.
Graham
-
Great idea @Sue Busher
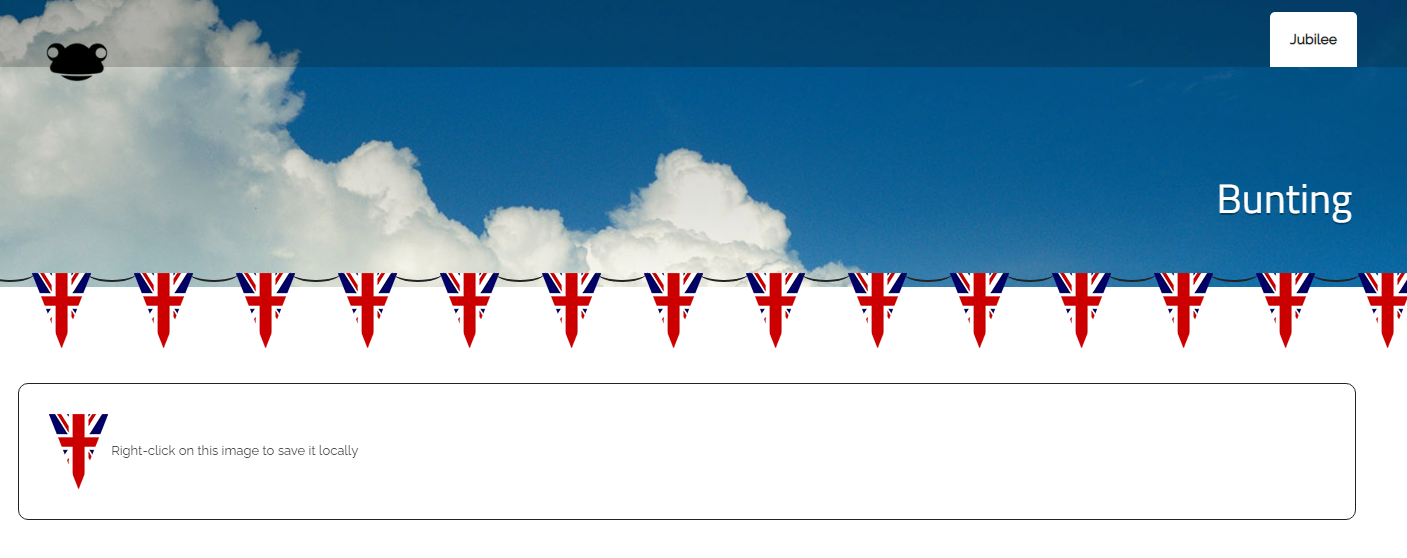
I've taken a crack at this, based on @Sean_M's christmas lights
JUBILEE BUNTING

https://concept-demo.frogos.net/bunting
The hardest bit was getting an image - in the end I made this one myself by cropping a royalty-free image:

<style>
    .ui-theme-basicnavigation-wrapmain {overflow-x: hidden;}
body {
    background: #000;
    }

 .bunting {
	 text-align: center;
	 white-space: nowrap;
	 overflow: hidden;
     position: absolute;
     top: -65px;
     left: -660px;
	 z-index: 1;
	 margin: 0 0 0 0;
	 padding: 0;
	 pointer-events: none;
	 width: auto;
}
 .bunting li {
	 position: relative;
	 list-style: none;
	 margin: 0;
	 padding: 0;
	 display: block;
	 width: 59px;
	 height: 75px;
	 margin: 20px;
	 display: inline-block;
	 background-image: url('IMAGE_FILE_URL_GOES_HERE');
}

 .bunting li:after {
	 content: "";
	 top: -12px;
	 left: 54px;
	 position: absolute;
	 width: 52px;
	 height: 18.6666666667px;
	 border-bottom: solid #222 2px;
	 border-radius: 50%;
}
 .bunting li:last-child:after {
	 content: none;
}
 .bunting li:first-child {
	 margin-left: -40px;
}

</style>

<ul class="bunting">
  <li></li>
  <li></li>
  <li></li>
  <li></li>
  <li></li>
  <li></li>
  <li></li>
  <li></li>
  <li></li>
  <li></li>
  <li></li>
  <li></li>
  <li></li>
  <li></li>
  <li></li>
  <li></li>
  <li></li>
  <li></li>
  <li></li>
  <li></li>
  <li></li>
  <li></li>
  <li></li>
  <li></li>
  <li></li>
  <li></li>
  <li></li>
  <li></li>
  <li></li>
  <li></li>
  <li></li>
  <li></li>
  <li></li>
  <li></li>
  <li></li>
  <li></li>
  <li></li>
  <li></li>
  <li></li>
  <li></li>
  <li></li>
  <li></li>
  <li></li>
  <li></li>
  <li></li>
  <li></li>
  <li></li>
  <li></li>
  <li></li>
  <li></li>
</ul>
Things to Note:
- This code is set to work on the default clouds theme. Just swap in the theme class at the top to prevent scrollbars
- Upload the pennant.png file to a text widget (easiest way to get the URL) and replace the placeholder code in the section .bunting li section background-image: url()
-
1
-
Hi Sue,
The Text widget can display some special characters, but that does depend on the fonts available (I think). This website is pretty handy for finding then copying and pasting icons:
I find that if I make each link it's own single-celled table, it becomes easy to copy and paste and retain the layout.
If you're trying to tidy up your policy pages, I recently posted this code:
This doesn't look identical to yours, but it's all in HTML so can be adapted easily enough. The benefit of the HTML solution is that you can use both Frog's icons as fonts and we import FontAwesome, which is packed with icons.
Graham
-
This is a good excuse for a FrogCode Tutorial to create a group messaging widget
To summarise, George is asking for a widget which a teacher could use to send a message to everyone in a group or just to some members of the group. We need the following:
- A method of selecting a group, which then lists the members
- A form / input to add the message
- The message API to be able to send the message.
Step 1 - Getting group members
After creating your widget within FrogCode Editor we need to load in the group search component. While this is not documented for use anywhere, it is available in the Random Name Selector - Basic widget tutorial, so we can copy it from there.
            steal.import('frogui/modules/selectusers/selectusers!frog-component').then(function() {
                var groupName = self.element.find("div.group-select input.groupName"),
                    groupSelect = self.element.find("div.group-select");

                groupSelect.frogui_modules_selectusers({
                    show_label: true,
                    label: 'Search for a group',
                    show_permission: false,
                    show_submit: true,
                    submit_label: 'Search for a group', // This button sends the selected group to the next function
                    allow_convert: false,
                    search_users: false,
                    max_selections: 1,
                    profiles: ['admin','staff','parent','governor','student','external admin','external staff'] // Determine which profile types are searchable with the group selector
                });
            });
We add this to the widget.live function so it becomes:
        'widget.live': function(el, ev, data) {
            this.element.html(
                this.view('main.ejs')
            );
            steal.import('frogui/modules/selectusers/selectusers!frog-component').then(function() {
                var groupName = self.element.find("div.group-select input.groupName"),
                    groupSelect = self.element.find("div.group-select");

                groupSelect.frogui_modules_selectusers({
                    show_label: true,
                    label: 'Search for a group',
                    show_permission: false,
                    show_submit: true,
                    submit_label: 'Search for a group',
                    allow_convert: false,
                    search_users: false,
                    max_selections: 1,
                    profiles: ['admin','staff','parent','governor','student','external admin','external staff'] // Determine which profile types are searchable with the group selector
                });
            });
        },
And this code needs to be added to the main.ejs page
<div class="group-select"><input type="text" class="groupName input-block-level" placeholder="Type name of group or profile" autocomplete="off"/></div>
Next, once a group is selected, we need a function to be triggered:
 'selectusers.submitted': function() {
   var self = this;
   var groupSelect = self.element.find("div.group-select");
    groupSelect.trigger('selectusers.getSelected', function(data) {
      console.log(data)
    });

},
On testing this is what we get so far
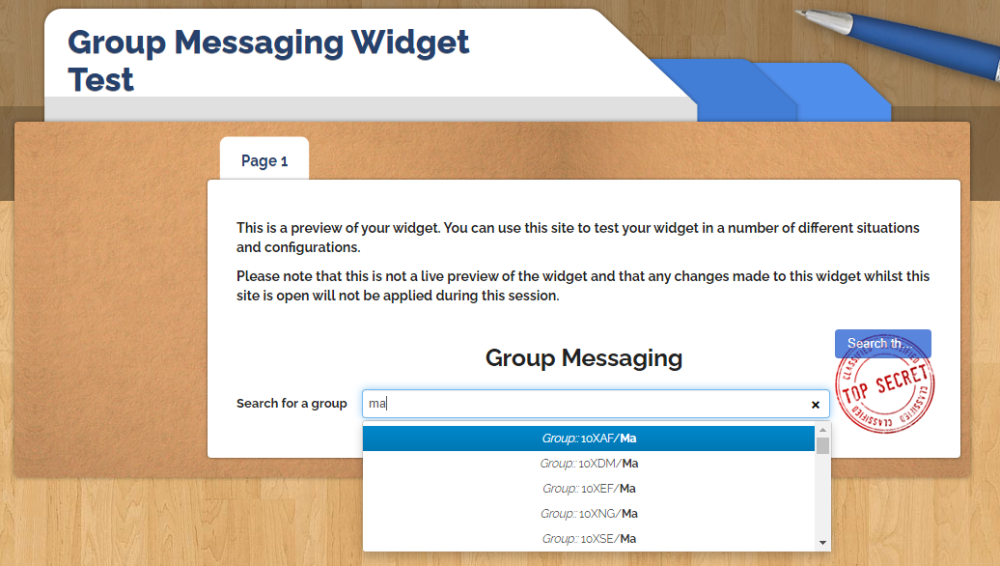
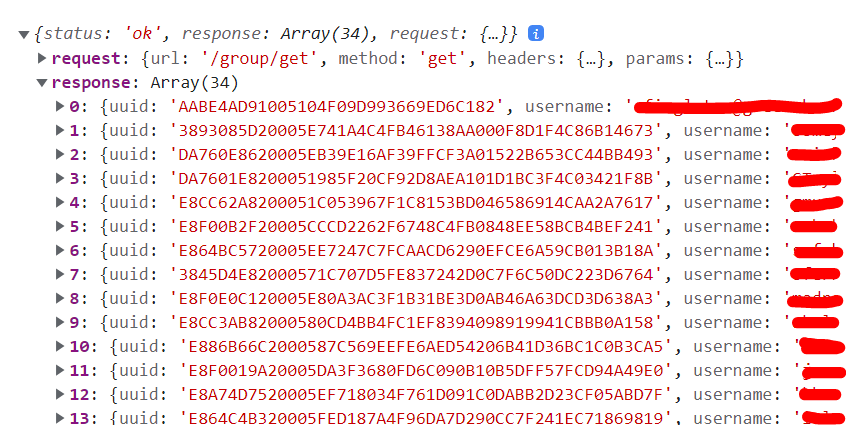
When a group is selected and the blue button pressed, this is returned in the console log
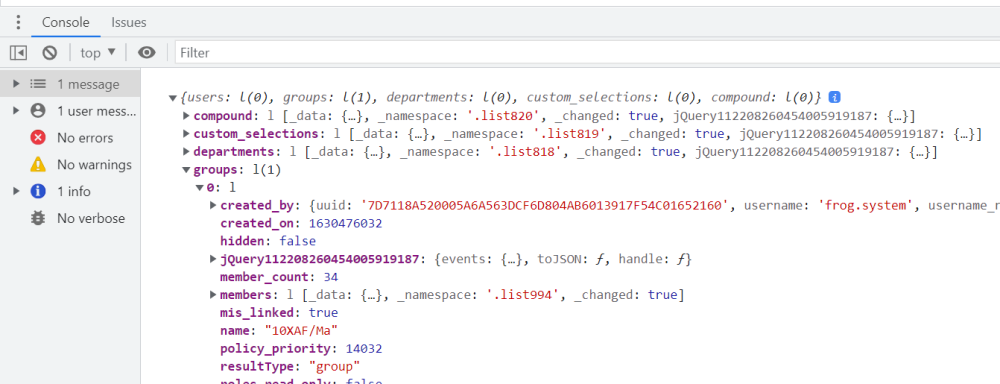
In the groups object, there is only the 0 entry listed. And in that entry, we get the group's name and it's UUID. Which means we can now use the FDP API to list all the members of that group.
From FrogDrive > Applications, open the FDP API Reference app, if it's not visible you'll find it in Package Manager > Ready to Install.
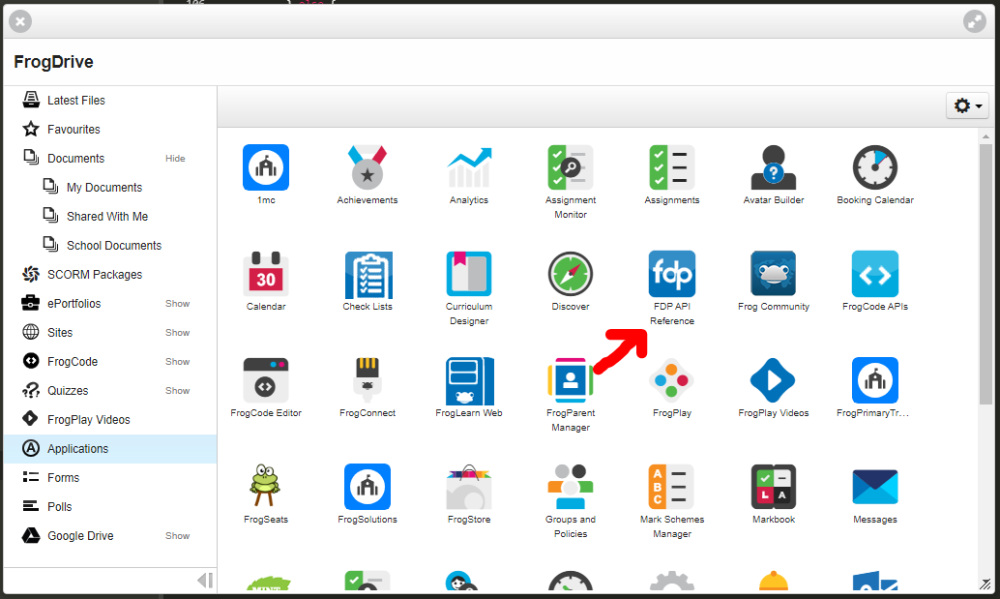
Once opened, you'll see details on all the Frog Developer Platform APIs. These APIs do not change, meaning they are safe for you to use, without fearing that our developers will update them.
There's a whole section for groups.
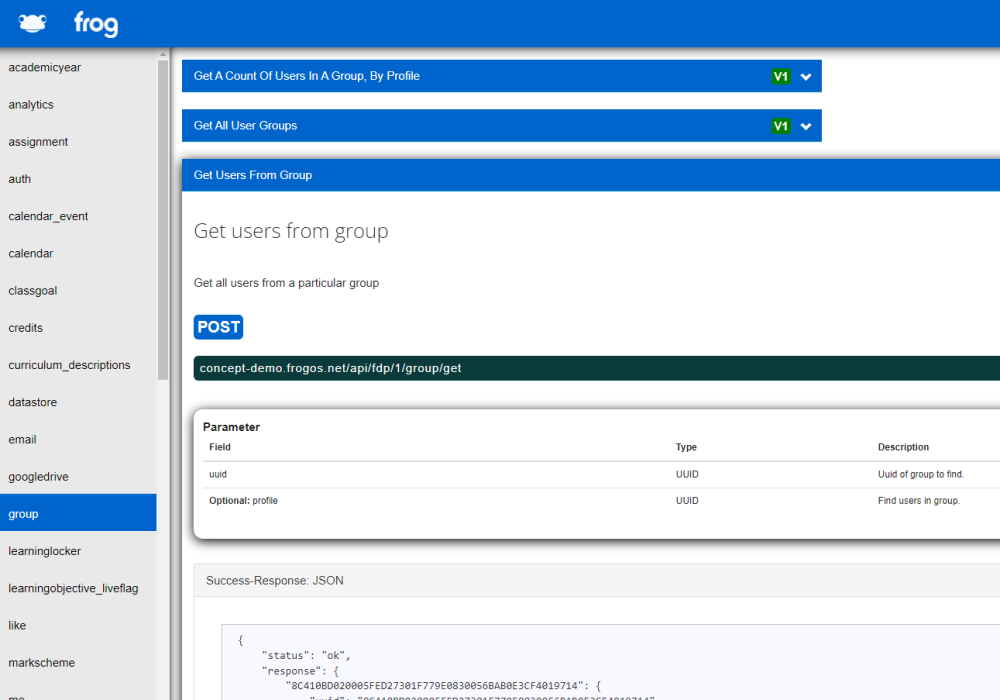
Using the FDP API template, we can search for our group's members in FDP 1, like this:
         'selectusers.submitted': function() {
             var self = this;
             var groupSelect = self.element.find("div.group-select");
             var table = self.element.find('.class_members');

             table.find('tr:gt(0)').remove();

             groupSelect.trigger('selectusers.getSelected', function(data) {
                 FrogOS.fdp({
                     url: 'group/get',
                     path: '/api/fdp/1/',
                     data: {
                         uuid: data.groups[0].uuid
                     }
                 }).done(function(response) {
                     // do something with the response data
                     var members = response;
                     console.log(members);
                 }).fail(function(e) {
                     // Report Error
                     console.log('failed');
                 });
             });
         },
Notes:
- The documentation states that this API is in the 1 directory, so you need to alter the template's path.
- The documentation also mentions it is a POST API, this is a mistake, it is a GET type.
- In a few steps, we'll be adding the class members to a table, so we set it as a variable at the top.
- By finding the table here, we can also empty it of previous searches using the remove function, otherwise each new class search will add to the bottom of the table.
Testing that, gives us this response:
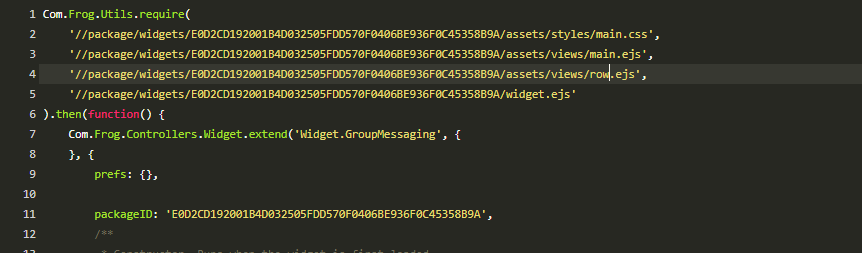
So now we have all the members of the class. We just need to list them, which is simple enough. we will create a table in main.ejs and a second ejs file called row. Then iterate through each member and create a row for them using self.view to do so. We also need to add row to the require section at the top of the widget.js file.

Row.ejs
<tr title="<%= username %>">
    <td><%= name %></td>
    <td><input type="checkbox" id="member_<%= uuid %>" name="member_<%= uuid %>" data-uuid="<%= uuid %>" class="checkbox member_<%= uuid %>" checked></td>
</tr>
Notes:
- Within the EJS files, I can use <%= %> to add additional javascript. In the next part, we'll pass through the name and uuid as part of the view append.
- Frog imports Bootstrap CSS, so we can take advantage of Bootstrap's table classes to set out some standard styling. But we'll use our own class name for the javascript and potentially additional CSS.
- Each row will already have the checkbox selected, as I assume it is likely to be a case of de-selecting a few students. Later we could add a Select all option.
         'selectusers.submitted': function() {
             var self = this;
             var groupSelect = self.element.find("div.group-select");
             var table = self.element.find('.class_members');

             table.find('tr:gt(0)').remove();

             groupSelect.trigger('selectusers.getSelected', function(data) {
                 FrogOS.fdp({
                     url: 'group/get',
                     path: '/api/fdp/1/',
                     data: {
                         uuid: data.groups[0].uuid
                     }
                 }).done(function(response) {
                     // do something with the response data
                     var members = response.response;

                     members.sort((a, b) => (a.displayname > b.displayname) ? 1 : -1);

                     $.each(members, function(index,member) {
                         table.append(
                             self.view('row.ejs', {
                                 name: member.displayname,
                                 username: member.username,
                                 uuid: member.uuid
                             })
                         )

                     });
                 }).fail(function(e) {
                     // Report Error
                     console.log('failed');
                 });
             });
         },
Notes:
- We know from the first console log's data for the API call that our members are listed in the response.response section, so we can set members to be that, instead of the whole response.
- A simple sort function, sorts all the members alphabetically by display name
- $.each allows us to create a new function for each individual in members, where each individual is its own object, called (in this case) 'member' - this contains all the individual data from the returned API
- In self.view we attach the file 'row.ejs', then in the object area, we have the names for the code used in row.ejs.
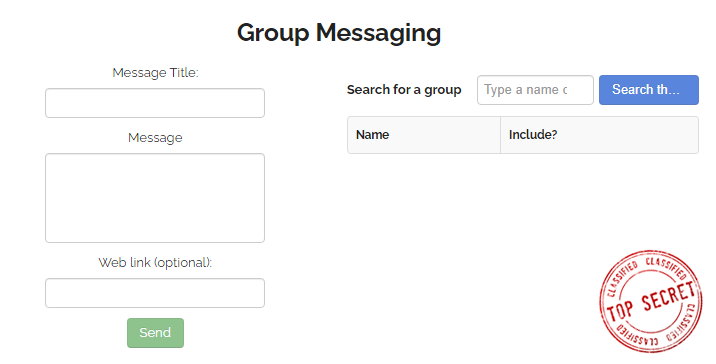
All of the above, gives us:

Which completes Step 1!
Step 2 - (Re)Creating the Message Input form
Looking at the Messaging application, we need the following fields:
- Title
- Message
- Recipients (we've got that covered)
- (Link is optional)
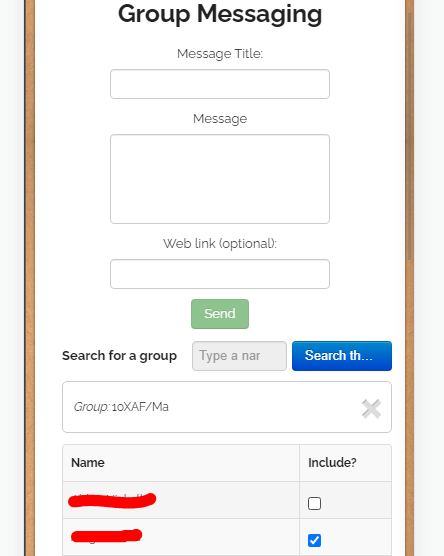
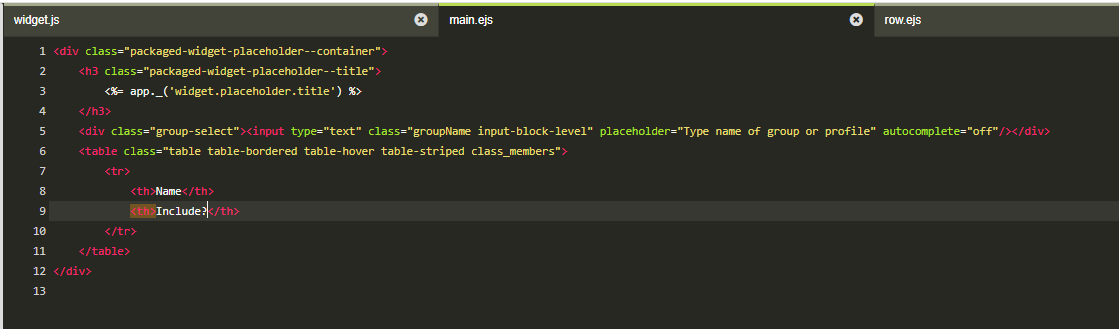
In Main.ejs, let's set the following:
<div class="packaged-widget-placeholder--container">
    <h3 class="packaged-widget-placeholder--title">
        <%= app._('widget.placeholder.title') %>
    </h3>
   <div class="row-fluid">
       <div class="message_form span6">
           <label for="title"><%= app._('widget.placeholder.message_title') %>:</label>
           <input type="text" id="title" name="title" class="message_title my_input">
           <label for="msg"><%= app._('widget.placeholder.message') %></label>
           <textarea id="msg" name="msg" class="message my_input" rows="4" cols="50"></textarea>
           <label for="link"><%= app._('widget.placeholder.link') %>:</label>
           <input type="text" id="link" name="link" class="message_link my_input">
           <br>
           <div class="btn btn-success disabled"><%= app._('widget.placeholder.send') %></div>
       </div>
       <div class="group_list span6">
           <div class="group-select message_group_select"><input type="text" class="groupName input-block-level" placeholder="Type name of group or profile" autocomplete="off"/></div>
           <table class="table table-bordered table-hover table-striped class_members">
               <tr>
                   <th>Name</th>
                   <th>Include?</th>
               </tr>
           </table>
       </div>
    </div>
</div>
Notes:
- Even though most web pages would use name or id to get the entries, because Frog loads all pages on top of each other, id can cause conflicts as it would be possible to use the same id twice. Classes however are part of the widget and you can have two DIVs with the same class in different widgets.
- We're borrowing some more bootstrap here, with the DIVs with classes "row-fluid" and "span6". This are used in the page layouts to organise everything without us having to style it all ourselves.
-
The breakout code such as <%= app._('widget.placeholder.message_title') %> uses the lang.manifest.json file to populate the text on the page. This is good practice, should another language be encoded into the platform. It also means there is only one place to find all the text and you can reuse the text in more than one place, so far, my lang.manifest.json looks like this:
{
    "en-GB": {
        "widget.title": "Group Messaging",
        "widget.placeholder.title": "Group Messaging",
        "preference.button_label": "Search for a group",
        "preference.button_submit_label": "List members",
        "widget.placeholder.message_title": "Message Title",
        "widget.placeholder.message": "Message",
        "widget.placeholder.link": "Web link (optional)",
        "widget.placeholder.send": "Send",
        "widget.placeholder.table_header_name": "Name",
        "widget.placeholder.table_header_include": "Include?"
    }
}
Note:
- To set the search button next to the search text box, I add CSS of position:relative; to the class "message_group_select"
It also collapses down nicely on mobiles:
The Send button is greyed out, until all the fields are completed. To change this, we'll use a change event, then check through the input elements and table checkboxes to see if the button can have the disabled class removed from it:
        '.my_input change': function(ev) {
            var title = this.element.find('.message_title').val();
            var message = this.element.find('.message').val();
            var table_rows = this.element.find('.class_members');

            if (title !== '' && message !== '' && table_rows.find('input:checked').length > 0) {
                this.element.find('.send').removeClass('disabled');
            }
        },
Notes:
- If all the table rows are unchecked, then the value of the length would be 0, if there is at least one row checked, the button can be enabled.
And now that that works, we can send a message.
Step 3 - Using the Message API
Unfortunately, there is no FDP API for the messaging application, so instead we have to "borrow" the official one.
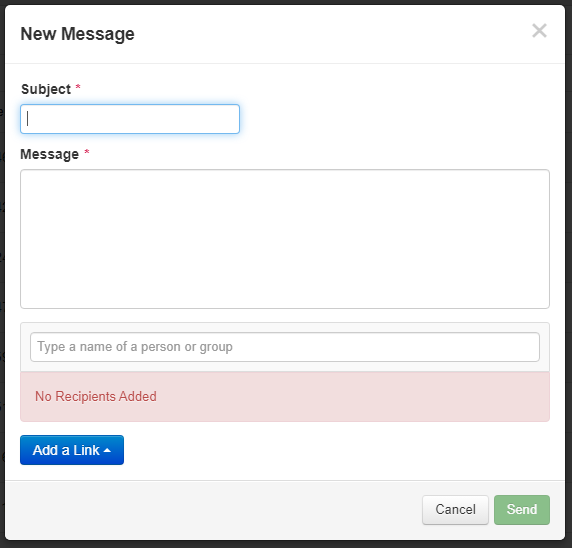
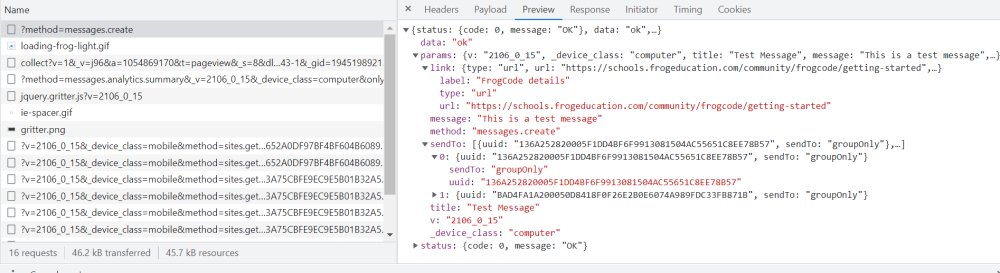
- Open up your developer console and the messaging application. Send a new message to several individuals, and include a link (we'll avoid site links, just stick with a URL).
- In the Developer console's Network tab, you'll see an API labeled '?method=messages.create'
-
When you click into that API, you'll see the params we need to pass through:
Create a new function, based on the click on the Send button. And inside that, copy the Internal API POST template:
        '.send:not(.disabled) click': function() {
            var self = this;
            var title = self.element.find('.message_title');
            var message = self.element.find('.message');
            var link = self.element.find('.message_link');
            var table_rows = self.element.find('.class_members').find('.checkbox:checked');
            var send = self.element.find('.send');

            var sendTo = [];
            $.each(table_rows, function(index, member) {
                    sendTo.push({
                        sendTo: 'groupOnly',
                        uuid: member.dataset.uuid
                    })
            });
            var data = {
                title: title.val(),
                message: message.val(),
                sendTo: sendTo
            };

            if (link.val() !== '') {
                data = {
                    title: title,
                    message: message,
                    sendTo: sendTo,
                    link: {
                        label: self.prefs.linkLabel.value,
                        type: 'url',
                        url: link
                    }
                };
            };

            Frog.Model.api('messages.create',
                data,
            {
                type: 'POST'
            }).done(function(response) {
                // do something with the response data

                send.addClass('disabled');
                title.val('');
                message.val('');
                link.val('');

            }).fail(function(e) {
                // Report Error

            });

        },
Notes:
- The functions inside FrogCode are declared slightly differently to how you may see them in online tutorials. The opening line here look for the button with the class of 'send' but not with the class of 'disabled' to be clicked.
- Self = this is a useful way of not having to bind the outer code to this function.
- Because George asked for specific individuals to be messaged, we need to populate the Sendto variable using the input boxes. By including in the input the data-uuid attribute, we can look at just the checked inputs.
- The parameters need to list the link value if we're sending a link, but if not, we have to not list it. It is much simpler to overwrite a data object than it is to add an extra field unfortunately, so we set the data object fields, then replace the whole thing if a link is present.
-
self.prefs.linkLabel.value looks for this widget preference:
        prefs: {
            linkLabel: {
                type: 'text',
                label: 'Link label for message',
                defaultValue: 'Link'
            }
        },
Which I added into the prefs section at the top of widget.js
And that's it! Obviously we could / should add a growl to demonstrate the message is sent and we could add an uncheck all button etc...
Summary
I'll tidy this widget up a little before releasing it, but hopefully you can see the process.
One bit of feedback I would like from you, (either here or privately in email), is this sort of tutorial useful to you? It took me quite a bit of time (as an amateur developer) to understand how to use Frog's APIs and what was possible to do with them when I did. I'm keen to know if having the steps broken down like this helps you build your own widgets.

-
Push is fairly easy then. We could list the members of a group, each with a checkbox and a message box. Two-way would probably involve all sorts of setting up an extra assignment.
hmmm.
-
And this would need to be 2-way? Or just to push messages out to everyone?
-
The data viewer is great for functionality, but I've had a few requests recently for a "prettier" version. The trouble is that form fields can be quite difficult to work out which response is for what field. This code bypasses that issue:
<style>
    .mydata_section {
        background: #ffffff;
        width: 100%;
        margin-bottom: 10px;
        border: 1px solid #CCCCCC;
        border-radius: 6px;
        padding: 6px;
        min-height: 50px;
        font-size: 16px;
        line-height: 21px;
    }

    .text_centre {
        text-align: center !important;
    }

</style>

<div class="my_data">
    <div class="row-fluid">
        <div class="span12 FIELD1"></div>
    </div>
    <div class="row-fluid">
        <div class="span2 text_centre FIELD2"></div>
        <div class="span10 FIELD3"></div>
    </div>

    <div class="row-fluid">
        <div class="span12 FIELD4"></div>
    </div>
</div>

<script>

var myDataDiv = arguments[0].find('.my_data');
var user = FrogOS.getUser();
var formUUID = 'FORM_UUID';

function getForm() {
    Frog.Model.api('dataviewer.gettable', {
        content_uuid: formUUID,
        current_user_only: 'false',
        form_uuid: formUUID,
        limit: 1,
        module: 'form',
        offset: '0',
        sort_dir: 'DESC',
        sort_field: 'date'
    }).done(function(response) {
        var fields = response.data[0].fields;

        $.each(fields, function(index, field) {
            var fieldClass = field.label.replace(/[^A-Z0-9]/ig, '');

                myDataDiv.find('.'+fieldClass).append(
                    '<div class="myform_text mydata_section">'+
                    '<b>'+field.label+'</b><BR>'+
                    field.responses[0].response+
                    '</div>'
                );
        })

    }); // end of API response

}
getForm();
</script>
What's going on
There's some CSS at the top, just to create a box for each field.
<style>
    .mydata_section {
        background: #ffffff;
        width: 100%;
        margin-bottom: 10px;
        border: 1px solid #CCCCCC;
        border-radius: 6px;
        padding: 6px;
        min-height: 50px;
        font-size: 16px;
        line-height: 21px;
    }

    .text_centre {
        text-align: center !important;
    }

</style>
Then there's standard HTML, but each DIV has a class which corresponds to the field name from the form. You have to remove any spaces or special characters and match the case. In the example, the fields are named "FIELD 1:" to "FIELD 4:" but the classes become FIELD1 etc... with the spaces and colons removed.
Because Frog uses Bootstrap, this allows us to use Span classes to set the width for each box. Span4 is a third the width of a page, Span12 is full width. The class row-fluid keeps all the span elements to matching widths.
<div class="my_data">
    <div class="row-fluid">
        <div class="span12 FIELD1"></div>
    </div>
    <div class="row-fluid">
        <div class="span2 text_centre FIELD2"></div>
        <div class="span10 FIELD3"></div>
    </div>

    <div class="row-fluid">
        <div class="span12 FIELD4"></div>
    </div>
</div>
The script section first finds the my_data DIV, then you need to identify the form's UUID.
It uses the Form's UUID with the Data viewer's API to get the form's entry, cycles through all the fields for the first entry it finds.
For each field, it generates a class name by taking the field name and removing spaces and special characters. Then it appends a new div to it, with the field's name (field.label) and the response.
<script>

var myDataDiv = arguments[0].find('.my_data');
var user = FrogOS.getUser();
var formUUID = 'FORM_UUID';

function getForm() {
    Frog.Model.api('dataviewer.gettable', {
        content_uuid: formUUID,
        current_user_only: 'false',
        form_uuid: formUUID,
        limit: 1,
        module: 'form',
        offset: '0',
        sort_dir: 'DESC',
        sort_field: 'date'
    }).done(function(response) {
        var fields = response.data[0].fields;

        $.each(fields, function(index, field) {
            var fieldClass = field.label.replace(/[^A-Z0-9]/ig, '');

                myDataDiv.find('.'+fieldClass).append(
                    '<div class="myform_text mydata_section">'+
                    '<b>'+field.label+'</b><BR>'+
                    field.responses[0].response+
                    '</div>'
                );
        })

    }); // end of API response

}
getForm();
</script>
-
1 hour ago, pconkie said:
3. It also isn't going to be that easy to work out who hasn't submitted an entry as the form is based on submissions rather than the members of a group.
The Who has Completed my Form widget could help with this - but I think you approach for files is probably the deciding factor.
-
@pconkie - hmm, so good points, I'd not considered. I'll bring these up with the product team.
In the meantime, Adam O has replied to me:
$('.os_core:first').trigger('os.app.upload', {
     "data": {
       "upload_type": "asset",
       "filter": ["image"],
       "site_uuid": "54AE54F3200254FB47F31FCC1EA58705E082717C10860FE0",
       "callback": function(result) {

       }
     }
   });
QuoteYou can pass filter array in the APIfilter: ['image']other options to pass to filter if you want are: video, audio, generic, pdf, tgz, csv and filenameEDIT
Doesn't sound like there's an option to limit the number of files though
EDIT 2
The filename filter intrigued me, so I asked about how to use it:
Quotehey, good question, it looks like you need to provide a full resource object as extra param so:filter: ['filename'], uploadResource: resource_object
it then uses that resources objectr.getName()+'.'+r.getExtension()-
1
-
-
Hi @pconkie
I've asked the developers - hopefully someone will be able to advise. In the meantime, have you considered using a Form - you've got the review capability via the data viewer. I've built several workflows, which use the hidden field option for submission review.
Graham
-
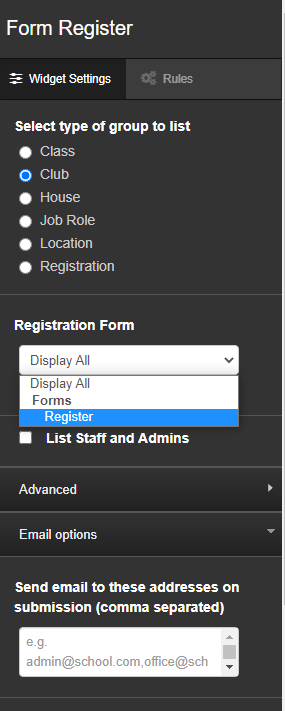
I think solves a major problem for a lot of schools.
Frog's forms can already be used for an after-school / co-curricular register, but they are designed for one entry at a time. This widget is designed to bypass that by submitting attendance details for each student in a group. The widget mimics the form submission and sends the entry straight to the data viewer. This provides your staff with search capabilities, entry editing and most importantly data security.
The widget can also be configured to email your co-curricular co-ordinator / office staff on submission. By default staff and admin profiles are hidden from the list, but a setting changes this, so the widget could be used for staff meeting attendance too.


https://schools.frogeducation.com/community/training/frogcodehub/frogcode-showcase/form-register
Obviously, I can help anyone if they struggle to get started with it, but hopefully the instructions on the install page and in the widget are straight forward.
-
7 minutes ago, ADT said:
@Graham Quince nevermind giving out badges can we fix the look of the Dyslexic Text background button....?
I'm too busy seeing if I can remove your existing badge - it bugs me too - but then I didn't think to check it for a smaller space.
-
Looks great. A nice idea to combine them all in one place.
Are there any other accessibility issues we might be able to solve? I did attempt to get somewhere with a screenreader, but regular browser extensions do this better.
-
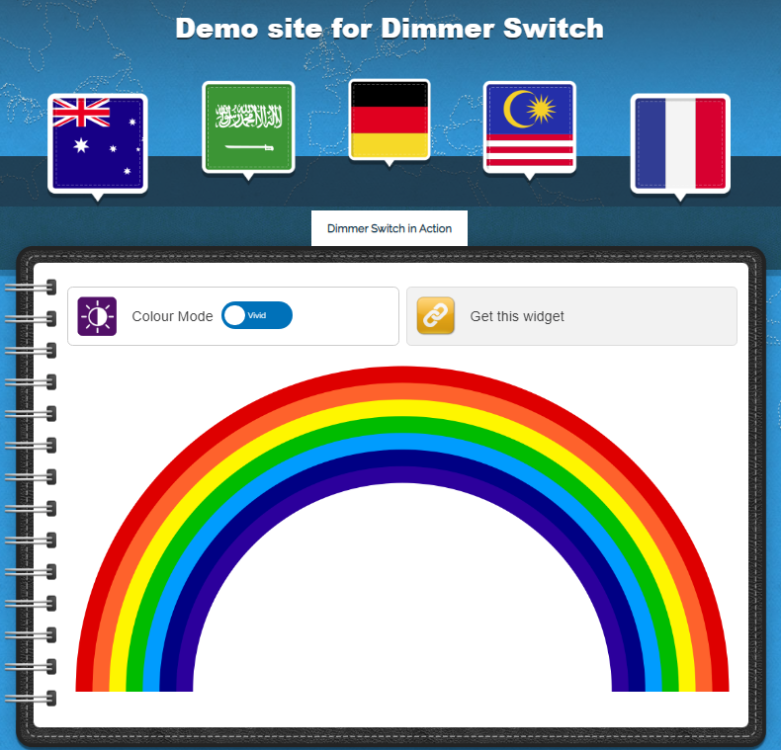
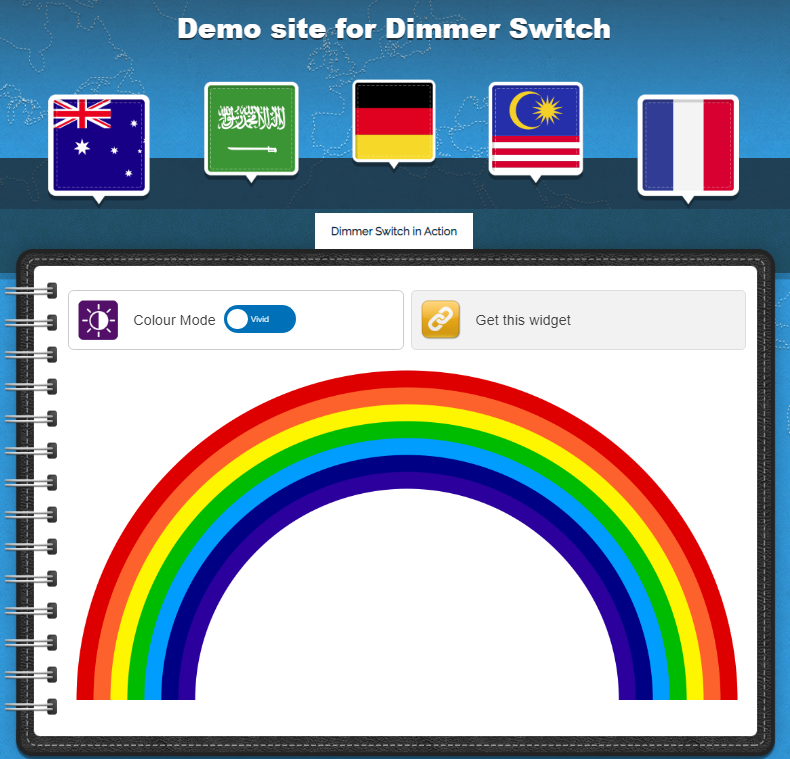
Inspired by the National Autistic Society, we have created this widget which reduces the saturation of all of Frog at the click of a switch. Add this switch to your student dashboard and it will affect the whole platform.
You can see it in action here: https://concept-demo.frogos.net/dimmer
Download from here: https://schools.frogeducation.com/community/training/frogcode/a-f/dimmer_switch

-
As in "you don't want the replies?"
-
Hi @gbligh - is the problem that the Wall widget has too large a heading, or that it allows replies or something else?


Special Characters & Print/Email
in General chat
Posted
Something like this: