
Search the Community
Showing results for tags 'css'.
Found 5 results
-
Hi everyone, Here's a bit of CSS you can add to an HTML widget to hide the first three columns in the Data Viewer widget should you want to: <style> /* Hide first three columns in Data Viewer */ div[data-content-uuid="WIDGET_UUID"] .dataviewer-list th:nth-child(2), div[data-content-uuid="WIDGET_UUID"] .dataviewer-list th:nth-child(3), div[data-content-uuid="WIDGET_UUID"] .dataviewer-list th:nth-child(4), div[data-content-uuid="WIDGET_UUID"] .dataviewer-list td:nth-child(2), div[data-content-uuid="WIDGET_UUID"] .dataviewer-list td:nth-child(3), div[data-content-uuid="WIDGET_UUID"] .dataviewer-list td:nth-child(4){ display: none !important; } </style>
-
 Every time I add in a text widget,, I have to resize the text, as it starts too small, is there a way of setting the size be default?
 -
Hi everyone, Here's part 2 in our Simple CSS tutorial series showing how you can use simple code to make a big change to FrogLearn: https://www.frogcommunity.com/css/font-size
-
 Following on this earlier post about styling individual elements in FrogLearn, here's how you can completely change the look of My Notes, including the title! You'll need to follow these steps first: Add your widget to page. Save and close the editor. Right-click on the widget and choose Inspect Element In the Elements section of the developer tools, move up the tree until in the page window, the entirety of the widget is highlighted In the Element area, copy the highlighted code Paste this code into your favourite code editor Isolate the bit called data-content-uuid="" Back to the browser, you can close the Developer tools. Re-edit the page and drag in the HTML widget Get started styling <style> div[data-content-uuid="your_UUID"]{ border-radius:5px; border:1px solid #DDDDDD; box-shadow: 5px 5px 5px #888888; } div[data-content-uuid="your_UUID"] .widget_notes .widget_notes-wrap .frame { color:#FF0000; background:#FFFFFF; background-image: none !important; height:100%; } div[data-content-uuid="your_UUID"] .widget_notes .widget_notes-wrap { color:#FF0000; background:#FFFFFF; background-image: none !important; height:100%; } div[data-content-uuid="your_UUID"] .widget_notes .widget_notes-wrap .header { color:#000000; background:#cccccc; background-image: none !important; text-indent:-9999px; line-height:0; margin:0px; height:30px; padding:0px; margin:0px; vertical-align:middle; border-bottom-radius:0px; } div[data-content-uuid="your_UUID"] .widget_notes .widget_notes-wrap .header:after { text-indent:0; display:block; line-height:30px; font-size:20px; font-family:Arial; content: 'My own title'; } </style>
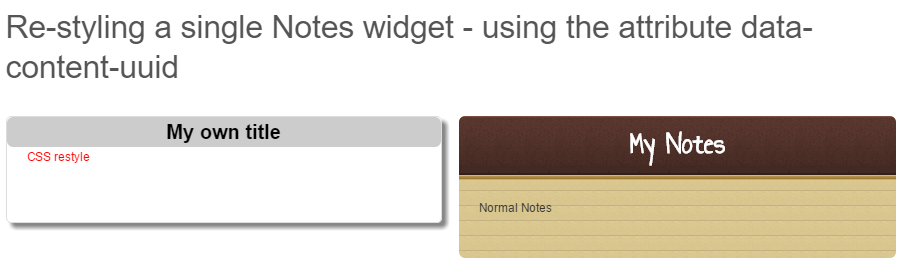
-
When I posted the snippet to allow you to restyle of My Notes, I hadn't thought that it wasn't as straight forward to change the title of Phrase of the Day. This bit of CSS is the easiest way I've found of changing all Phrases of the Day, although if you combine it with the the technique(?) mentioned in the restyling My Notes, you can restyle individual widgets in the same way. <style> .widget_phrase-wrap .header { height:50px; overflow:hidden; } .widget_phrase-wrap .header h2::before { content: 'My own title \a'; white-space: pre; } </style>
