

pconkie
-
Posts
598 -
Joined
-
Last visited
Everything posted by pconkie
-
@Chris.Smith Trying to change from $(selector) to this.element.find(selector) Had this which shows week two of a two week timetable (and hides week one) $(".mywrapper #wk1btn").click(function() { $(".mywrapper #week1").hide(); $(".mywrapper #week2").show(); )}; Now i've got this... var $wk1btn = this.element.find(".mywrapper #wk1btn"); $wk1btn.click(function() { var $week1 = this.element.find(".mywrapper #week1"); ******* $week1.hide(); var $week2 = this.element.find(".mywrapper #week1"); $week2.show(); }); But get an uncaught type error: cannot read property 'find' of undefined on line **** above. Any thoughts? Ta Paul
-
Thanks Chris that makes perfect sense! (the bit about this.element). Like Doc Brown said to Marty McFly: "You're not thinking fourth-dimensionally!". Any takers for which BTTF movie? I had thought that if I had a wrapper with a unique class name that would would avoid potential issues. But of course if there is more than one version of the widget running the class would not be unique. Ok. I'm changing everything to use this.element.....
-
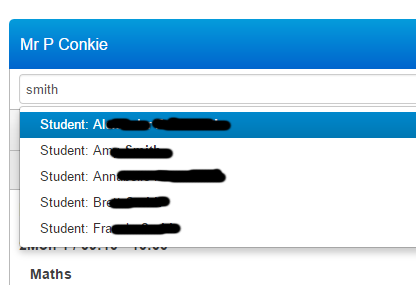
Step 6: Searching and displaying other users timetables I just stole the mark-up from the frog timetable viewer which has a hidden search box, which once revealed allows you to start typing a users name and displays the results just below. Once a user is selected from the list their timetable loads. Mark-up code is: <div class="widget_timetable widget_timetable_user widget_timetable_user_search"> <div class="theme-headerbg clearfix"> <h2 class="widget-title btn btn-text os-ellipsis" id="searchResult"></h2> <button type="button" class="btn btn-text pull-right" id="toggleSearch"><i class="os-icon search-icon"></i></button> </div> <div class="frogui_components_search" data-component="search" style="display: none;"> <form class="search"> <input autocomplete="off" type="text" name="needle" placeholder=""> <ul class="typeahead dropdown-menu" style="top: 30px; left: 0px; display: none;"></ul> <button id="btn-clear" class="search-btn os-icon search-icon search-btn-clear" type="button"></button> </form> </div> </div> Keeping the frog classes in meant that it looked really good straight away! The it was *just* the case of attached all of the events again... 1. Toggling the visibility of the search box when the search icon is clicked 2. Calling the textsearch.search api and filling the dropdown-menu ul 3. Re-setting the search box when the clear-search button is clicked 4. Hiding the dropdown-menu when it has lost focus 5. Calling the getTimetable api when a user is selected from the drop-down menu and displaying their timetable and displayname in the widget title 6. Preventing the default behaviour of the return key (which wants to submit the form which would navigate us away from the page) Code to follow....
-
Hi Chris @Chris.Smith I've got a couple of questions too.... 1. In this line $table = this.element.find('table:first' what does 'this' refer to? - the document, the html widget, something else? 2. Is this also the line showing your preferred way to find an element? $table = this.element.find('table:first'); - this uses this.element with a tag? $template = this.element.find('.template tbody > tr'); this uses this.element with a class? How would $template = $('.template tbody > tr'); be different? 3. what does .bind(this) do in your script? Thanks for your help. Paul
-
Hi Michael Although it's not the way i would go about it, I can't see much wrong with your code. However, I do get an error "sortTable not defined" when i try your code. Clearly it is defined, so i think this is probably to do with limitations in the frog html widget. I've got client side sorting working in frog using tablesorter (http://tablesorter.com) which i have used for years and supports a ton of options like multiple column sorting using the ctrl key. Examples on this fiddle http://jsfiddle.net/Mottie/4mVfu/1/ Try this code: <script type="text/javascript" src="https://mottie.github.io/tablesorter/js/jquery.tablesorter.js"></script> <script> $(document).ready(function() { $("#myTable").tablesorter(); } ); </script> <style> table.GeneratedTable { width: 100%; background-color: #ffffff; border-collapse: collapse; border-width: 1px; border-color: #e6e6e6; border-style: double; color: #000000; } table.GeneratedTable td, table.GeneratedTable th { border-width: 1px; border-color: #e6e6e6; border-style: double; padding: 10px; } table.GeneratedTable thead { background-color: #52b9e9; } </style> <table class="GeneratedTable" id="myTable"> <thead> <tr> <th>Name</th> <th>House</th> <th>Tutor</th> <th>Achievement</th> <th>Behaviour</th> <th>Total</th> </tr> </thead> <tbody> <tr> <td>Student 1</td> <td>Bowman</td> <td>ACR</td> <td>1100</td> <td>10</td> <td>1090</td> </tr> <tr> <td>Student 2</td> <td>Fulford</td> <td>ACR</td> <td>1623</td> <td>196</td> <td>1427</td> </tr> <tr> <td>Student 3</td> <td>Netherfield</td> <td>MOB</td> <td>1507</td> <td>198</td> <td>1309</td> </tr> <tr> <td>Student 4</td> <td>Saunderson</td> <td>MOB</td> <td>1920</td> <td>326</td> <td>1594</td> </tr> <tr> <td>Student 5</td> <td>Weirfield</td> <td>RBA</td> <td>1835</td> <td>85</td> <td>1750</td> </tr> <tr> <td>Student 6</td> <td>Bowman</td> <td>RBA</td> <td>1634</td> <td>320</td> <td>1314</td> </tr> <tr> <td>Student 7</td> <td>Fulford</td> <td>AHI</td> <td>1470</td> <td>503</td> <td>967</td> </tr> <tr> <td>Student 8</td> <td>Netherfield</td> <td>AHI</td> <td>2036</td> <td>337</td> <td>1699</td> </tr> <tr> <td>Student 9</td> <td>Saunderson</td> <td>AHU</td> <td>1342</td> <td>134</td> <td>1208</td> </tr> <tr> <td>Student 10</td> <td>Weirfield</td> <td>AHU</td> <td>1575</td> <td>247</td> <td>1328</td> </tr> <tr> <td>Student 11</td> <td>Bowman</td> <td>GUN</td> <td>1575</td> <td>170</td> <td>1405</td> </tr> <tr> <td>Student 12</td> <td>Fulford</td> <td>GUN</td> <td>1416</td> <td>200</td> <td>1216</td> </tr> <tr> <td>Student 13</td> <td>Netherfield</td> <td>FNA</td> <td>1991</td> <td>488</td> <td>1503</td> </tr> <tr> <td>Student 14</td> <td>Saunderson</td> <td>FNA</td> <td>1596</td> <td>90</td> <td>1506</td> </tr> <tr> <td>Student 15</td> <td>Weirfield</td> <td>HTA</td> <td>1553</td> <td>188</td> <td>1365</td> </tr> <tr> <td>Student 16</td> <td>Bowman</td> <td>HTA</td> <td>1570</td> <td>277</td> <td>1293</td> </tr> <tr> <td>Student 17</td> <td>Fulford</td> <td>DRO</td> <td>1444</td> <td>414</td> <td>1030</td> </tr> <tr> <td>Student 18</td> <td>Netherfield</td> <td>DRO</td> <td>1702</td> <td>367</td> <td>1335</td> </tr> <tr> <td>Student 19</td> <td>Saunderson</td> <td>SPK</td> <td>2027</td> <td>387</td> <td>1640</td> </tr> <tr> <td>Student 20</td> <td>Weirfield</td> <td>SPK</td> <td>1512</td> <td>140</td> <td>1372</td> </tr></tbody> </table> You might not like how your first column is sorted by default, but with tablesorter you can write a custom parser to handle the mixed text/numbers you have in column 0. Something like this should do it... <script type="text/javascript" src="https://mottie.github.io/tablesorter/js/jquery.tablesorter.js"></script> <script> $(document).ready(function() { $.tablesorter.addParser({ id: 'studentsorting', is: function(s) { return false; }, format: function(s) { return s.toLowerCase().replace(/student /,''); }, type: 'numeric' }); $("#myTable").tablesorter({ headers: { 0: { sorter:'studentsorting' } } }); }); </script> <style> table.GeneratedTable { width: 100%; background-color: #ffffff; border-collapse: collapse; border-width: 1px; border-color: #e6e6e6; border-style: double; color: #000000; } table.GeneratedTable td, table.GeneratedTable th { border-width: 1px; border-color: #e6e6e6; border-style: double; padding: 10px; } table.GeneratedTable thead { background-color: #52b9e9; } </style> <table class="GeneratedTable" id="myTable"> <thead> <tr> <th>Name</th> <th>House</th> <th>Tutor</th> <th>Achievement</th> <th>Behaviour</th> <th>Total</th> </tr> </thead> <tbody> <tr> <td>Student 1</td> <td>Bowman</td> <td>ACR</td> <td>1100</td> <td>10</td> <td>1090</td> </tr> <tr> <td>Student 2</td> <td>Fulford</td> <td>ACR</td> <td>1623</td> <td>196</td> <td>1427</td> </tr> <tr> <td>Student 3</td> <td>Netherfield</td> <td>MOB</td> <td>1507</td> <td>198</td> <td>1309</td> </tr> <tr> <td>Student 4</td> <td>Saunderson</td> <td>MOB</td> <td>1920</td> <td>326</td> <td>1594</td> </tr> <tr> <td>Student 5</td> <td>Weirfield</td> <td>RBA</td> <td>1835</td> <td>85</td> <td>1750</td> </tr> <tr> <td>Student 6</td> <td>Bowman</td> <td>RBA</td> <td>1634</td> <td>320</td> <td>1314</td> </tr> <tr> <td>Student 7</td> <td>Fulford</td> <td>AHI</td> <td>1470</td> <td>503</td> <td>967</td> </tr> <tr> <td>Student 8</td> <td>Netherfield</td> <td>AHI</td> <td>2036</td> <td>337</td> <td>1699</td> </tr> <tr> <td>Student 9</td> <td>Saunderson</td> <td>AHU</td> <td>1342</td> <td>134</td> <td>1208</td> </tr> <tr> <td>Student 10</td> <td>Weirfield</td> <td>AHU</td> <td>1575</td> <td>247</td> <td>1328</td> </tr> <tr> <td>Student 11</td> <td>Bowman</td> <td>GUN</td> <td>1575</td> <td>170</td> <td>1405</td> </tr> <tr> <td>Student 12</td> <td>Fulford</td> <td>GUN</td> <td>1416</td> <td>200</td> <td>1216</td> </tr> <tr> <td>Student 13</td> <td>Netherfield</td> <td>FNA</td> <td>1991</td> <td>488</td> <td>1503</td> </tr> <tr> <td>Student 14</td> <td>Saunderson</td> <td>FNA</td> <td>1596</td> <td>90</td> <td>1506</td> </tr> <tr> <td>Student 15</td> <td>Weirfield</td> <td>HTA</td> <td>1553</td> <td>188</td> <td>1365</td> </tr> <tr> <td>Student 16</td> <td>Bowman</td> <td>HTA</td> <td>1570</td> <td>277</td> <td>1293</td> </tr> <tr> <td>Student 17</td> <td>Fulford</td> <td>DRO</td> <td>1444</td> <td>414</td> <td>1030</td> </tr> <tr> <td>Student 18</td> <td>Netherfield</td> <td>DRO</td> <td>1702</td> <td>367</td> <td>1335</td> </tr> <tr> <td>Student 19</td> <td>Saunderson</td> <td>SPK</td> <td>2027</td> <td>387</td> <td>1640</td> </tr> <tr> <td>Student 20</td> <td>Weirfield</td> <td>SPK</td> <td>1512</td> <td>140</td> <td>1372</td> </tr></tbody> </table> Hope you find that useful.
-
Step 5: Giving each subject their own background colour Each subject gets in own background colour (actually if a student has two different teachers for the same subject those lessons get different background colours too, but you could change that). What I wanted to avoid was listed every possible subject in frog and assigning a corresponding colour. If possible this should have zero configuration. I wondered if i could somehow turn unique strings into unique colours e.g "science" --> blue, but "maths" --> green. There are a few ways of setting a colour in html5 but one way is using a hex. 3 pairs of code, the first for the red content, the next for the green content and the last for the blue content e.g. #FF0000 (Red) FF=255 red, 00=0 green, 00=0 blue. So can i turn strings of different length into a hex? Random wouldn't work as I would want the same colour each time the subject appeared. Didn't have to write this code, the answer (and credit) was found here: http://stackoverflow.com/questions/3426404/create-a-hexadecimal-colour-based-on-a-string-with-javascript //this is a function to consistently generate a colour for any string passed to it e.g. a subject name var stringToColour = function(str) { var hash = 0; for (var i = 0; i < str.length; i++) { hash = str.charCodeAt(i) + ((hash << 5) - hash); } var colour = '#'; for (var p = 0; p < 3; p++) { var value = (hash >> (p * 8)) & 0xFF; colour += ('00' + value.toString(16)).substr(-2); } return colour; }; This works great, but there is an issue. All of the font is black, and so can not be read if the background colour is black (or dark). Any font colour would have the same issue! To fix this issue we need to test the brightness of the colour generated from the function above and set the font to either black or white based on which has the best contrast. Ideas found here: https://24ways.org/2010/calculating-color-contrast I preferred the results when calculating the YIQ (https://en.wikipedia.org/wiki/YIQ) rather than comparing the hex to the hex which is halfway between pure black and pure white. var getForegroundColor = function(hexcolor) { var r = parseInt(hexcolor.substr(1,2),16); var g = parseInt(hexcolor.substr(3,2),16); var b = parseInt(hexcolor.substr(5,2),16); var yiq = ((r*299)+(g*587)+(b*114))/1000; return (yiq >= 128) ? 'black' : 'white'; }; I could possibly put these two functions together, but at the moment I have them separate and use them to colour the timetable like so... //this is a pre-existing line in the done() of the api call $(".mywrapper table tr td[id='"+periods.name+"']").html(periods.subject+'<BR />'+periods.teacher.displayname+'<BR />'+periods.room.slice(-3)); /////////////////////////////////////////////////////////////// //add these three lines and the two functions from above var bgcolor = stringToColour(periods.subject+periods.teacher.username); $(".mywrapper table tr td[id='"+periods.name+"']").css("background-color", bgcolor); $(".mywrapper table tr td[id='"+periods.name+"']").css("color", getForegroundColor(bgcolor)); //interested in more efficient ways of doing this. So you won't have any control over what colours are used, but this requires no configuration and you will get a nice consistently coloured timetable.
-
Step 4: Filling the table with this weeks timetable for the currently logged in user This javascript should go before the code in step 3. <script> var currentuser = FrogOS.getUser(); //currentuser.uuid now contains the logged in users uuid //this function sends a request for the selected users timetable and is called as soon as the document is ready (below) var getTimetable = function(anyuuid) { $(".mywrapper table td").html(''); //these two lines act as a 're-set' for the timetable grid (clear text and background colour) $(".mywrapper table td").css("background-color",''); //not strictly required but as soon as we want to show another users timetable will be handy! Frog.Model .api( 'timetables.getTimetable', { limit: 2, //how many weeks of timetable data to return? offset: 0, //how many weeks ahead of current week? 0=current week (can be negative value) week_starts_on: 1, //what day of the week is the first day 1=Monday user_uuid: currentuser.uuid, //uuid of current user target: [anyuuid] //uuid for timetable we are looking up } ).done(function(thisResponse) { if (thisResponse.status.code == 0) { //check the response returned without error. Should this be ===? var data = thisResponse.data[0]; //get the bit of the reponse we want $.each(data.weeks, function(i,weeks) { //here loop through each week of data look at each period of each day of each of those weeks. $.each(weeks.days, function(p,days) { $.each(days.periods, function(q,periods) { $(".mywrapper table tr td[id='"+periods.name+"']").html(periods.subject+'<BR />'+periods.teacher.displayname+'<BR />'+periods.room); //line above matches correct cell in table to correct period in data returned using periods.name }); }); }); } }); }; $(document).ready(function() { //when the document is ready getTimetable(); //call the api passing no parameter. Default behaviour is that we will get back the current users timetable. }); </script> If there are issues make sure that the cells in your table (td) have an id that exactly match the period names that your MIS (and therefore frog) are using. It doesn't look very colourfull yet! In the next step - the mathematics of colour
-
Step 3: Basic mark-up and CSS for the 'week to view' We have to bear in mind that different schools have different timetable structures. In the final version the layout html is generated dynamically based on the number of days in the cycle and the number of periods in each day. For now we will keep it simple and fix the layout for a 5 day timetable with 7 periods each day. <style> .mywrapper .table tbody tr { height: 50px; } .mywrapper .table th { text-align: center; } </style> <div class="mywrapper"> <table class="table table-bordered"> <thead> <tr> <th>This Week</th> <th>Monday</th> <th>Tuesday</th> <th>Wednesday</th> <th>Thursday</th> <th>Friday</th> </tr> </thead> <tbody> <tr> <th>REG</th> <td id="1Mon REG"></td> <td id="1Tue REG"></td> <td id="1Wed REG"></td> <td id="1Thu REG"></td> <td id="1Fri REG"></td> </tr> <tr> <th>LESSON 1</th> <td id="1Mon 1"></td> <td id="1Tue 1"></td> <td id="1Wed 1"></td> <td id="1Thu 1"></td> <td id="1Fri 1"></td> </tr> ///////////////////// ///Repeat <tr> to </tr> ///for additional periods ///////////////////// </tbody> </table> </div> This gives the following output on a frog page: <div class="mywrapper"> ......</div> Everything is inside this div. I've noticed that code in a HTML widget on a page has the potential to affect other open pages and sometimes have even worse consequences! By having everything inside a div with a (undefined) class we can attempt to better control the consequences of our code. For example, i chose to use a table (I know, i'm a bit old fashioned) and as frog utilities bootstrap css (http://getbootstrap.com/css/#tables) I have taken advantage of the built in styles available.... <table class="table table-bordered"> Those two classes (table and table-bordered) style the table producing the thin border and the bold column and 'row' headings. I wanted to over-ride the table class a little bit by adding a fixed row height and center the text, but was concerned that I might affect other tables on the frog platform. So I made use of the div everything is inside with the class - mywrapper (which i assume is unique, but could change it to make it 'more unique'). <style> .mywrapper .table tbody tr { height: 50px; } .mywrapper .table th { text-align: center; } </style> The space between the classes is the descendant selector. So this line reads.... .mywrapper .table tbody tr select all the table rows (tr) that are in all the body's (tbody) of all the tables with a class of table (.table) as long as those tables are inside an element with the mywrapper class (.mywarpper). As far as I am aware this is pretty precise styling and should cause problems elsewhere, but please chip-in if you disagree or think there is a better way etc The ids on the table cells (td) are crucial and must exactly match the period labels used by the school/MIS. Step 4 when i get a chance - filling the table with this weeks timetable for the currently logged in user.

-
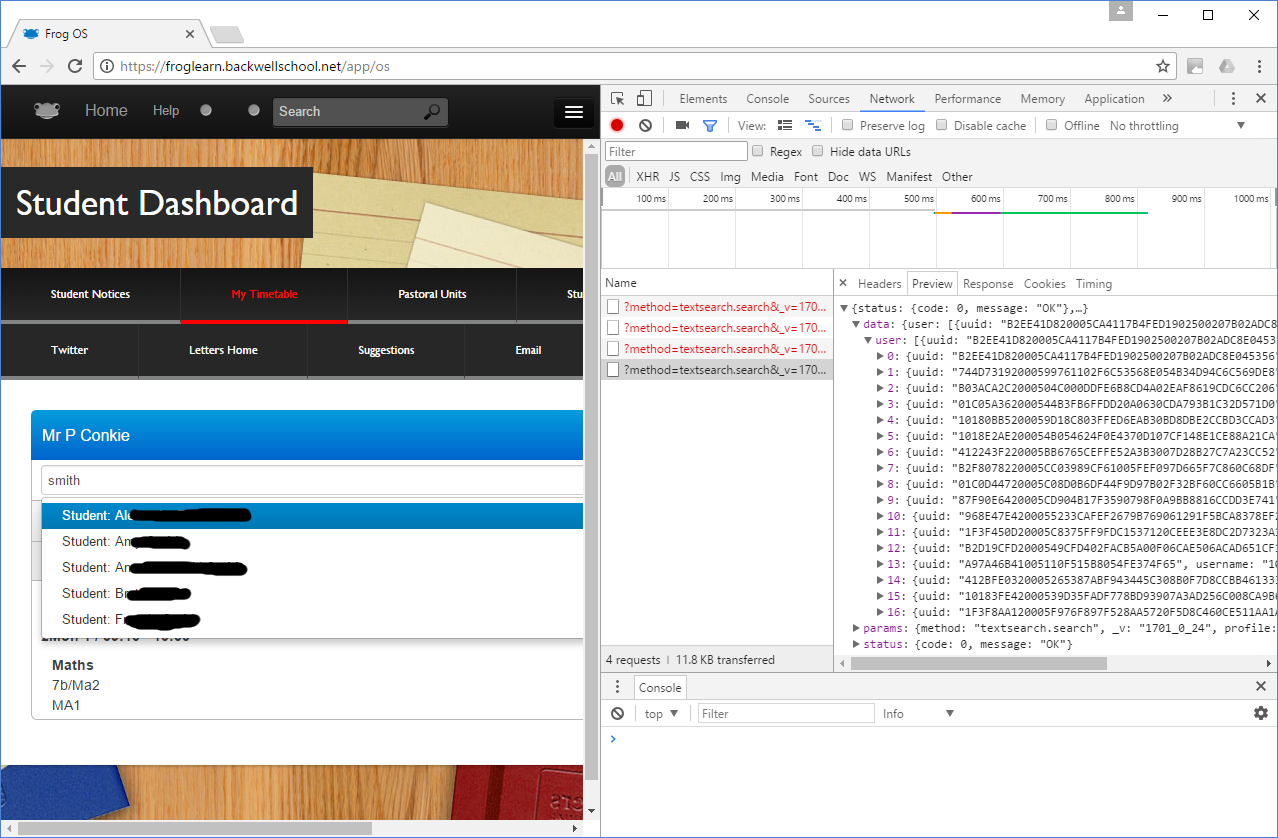
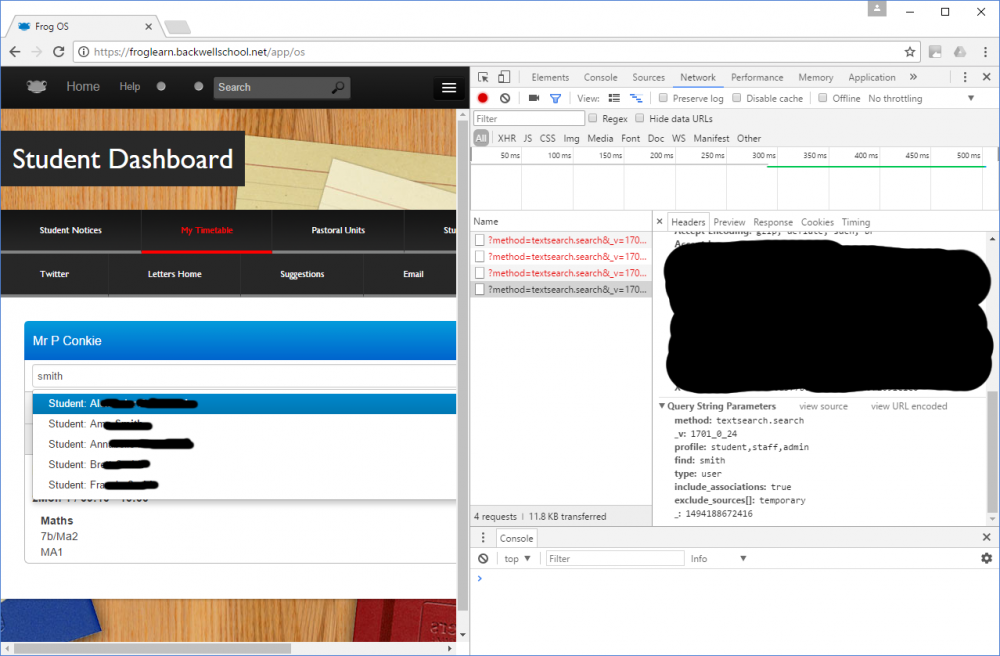
STEP 2: Analyse the other frog timetable widget api call. The second api the frog timetable widget makes use of is textsearch.search Above you can see that I am searching for 'smith' by typing that into the search box. Each time a key is pressed (once there is more than one letter typed) a call to the api is made. Again it is a GET request with the following parameters: 1. profile (string) - which profiles to include in the search 2. type (string) - presume type of entity (user, site? resource?) So that the api is re-usable in different contexts. 3. include_associations (boolean?) - no idea 4. exclude_sources (array) - no idea 5. find (string) - the term to search for Example function attached to a keyup event: $('input').keyup(function() { var s = this.val(); if(s.length > 1) { Frog.Model .api( 'textsearch.search', { profile: 'student,staff', find: s, type: 'user', include_associations: true, exclude_sources: ['temporary'] } ).done(function(thisResponse) { if (thisResponse.status.code == 0) { //empty some ul //looop through the users returned //re-fill the ul with li containing user information } }); } }); The information returned by this api is much more straight forward. If we look in data we find a user collection containing all of the users that match my search for 'smith'. You can see that I have 17 returned matches. I can loop through the users and print out their profile, display name and uuid (which is what we need to pass to tables.getTimetable something like this.... //again this should go inside the done() of the api call, that way it will wait for a response if (thisResponse.status.code == 0) { $(".mywrapper ul").empty(); var rusers = thisResponse.data.user; if (rusers.length) { $.each(rusers, function(i,users) { $(".mywrapper ul").append('<li data-value="'+users.uuid+'">'+users.profile.name+':'+users.displayname+'</li>'); }); } } So we now have a fairly good idea how the frog timetable viewer works and in particular the mechanics of the two api's it uses. We are now ready in step 3 to make an alternative timetable viewer!

-
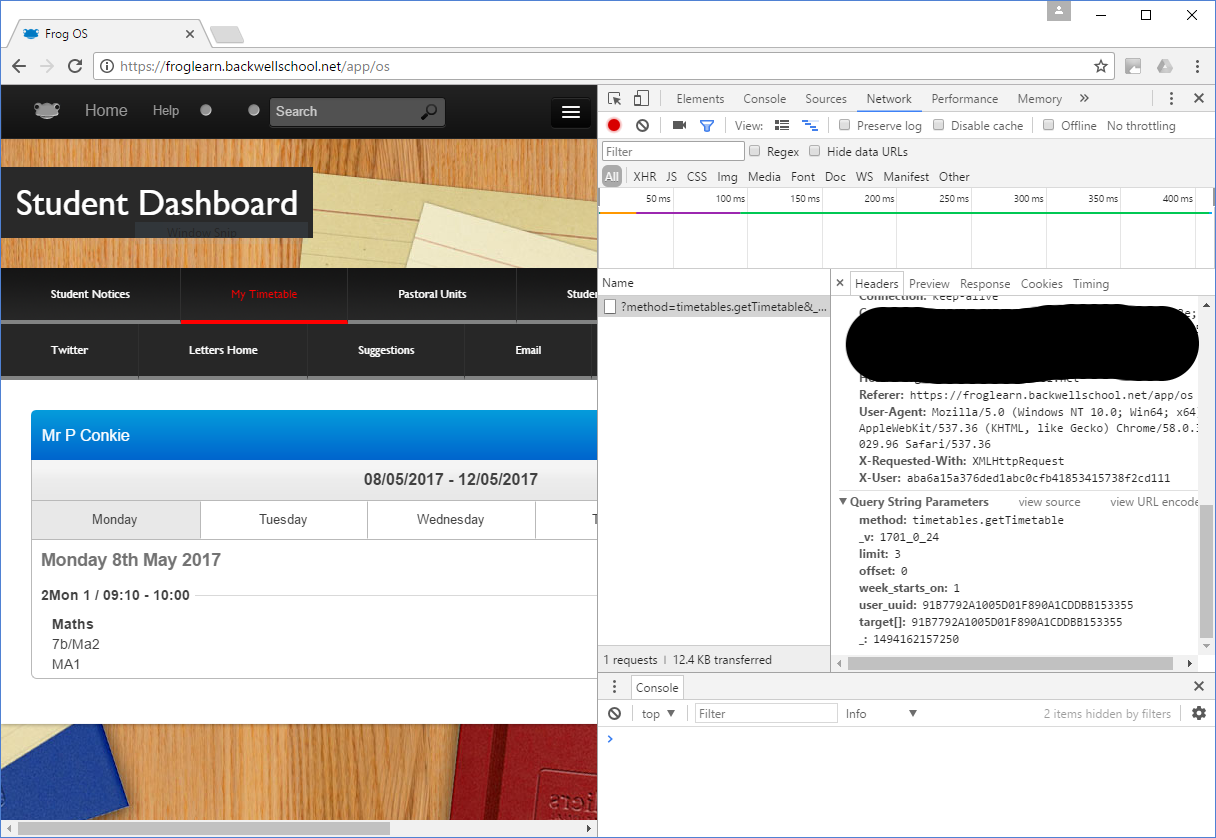
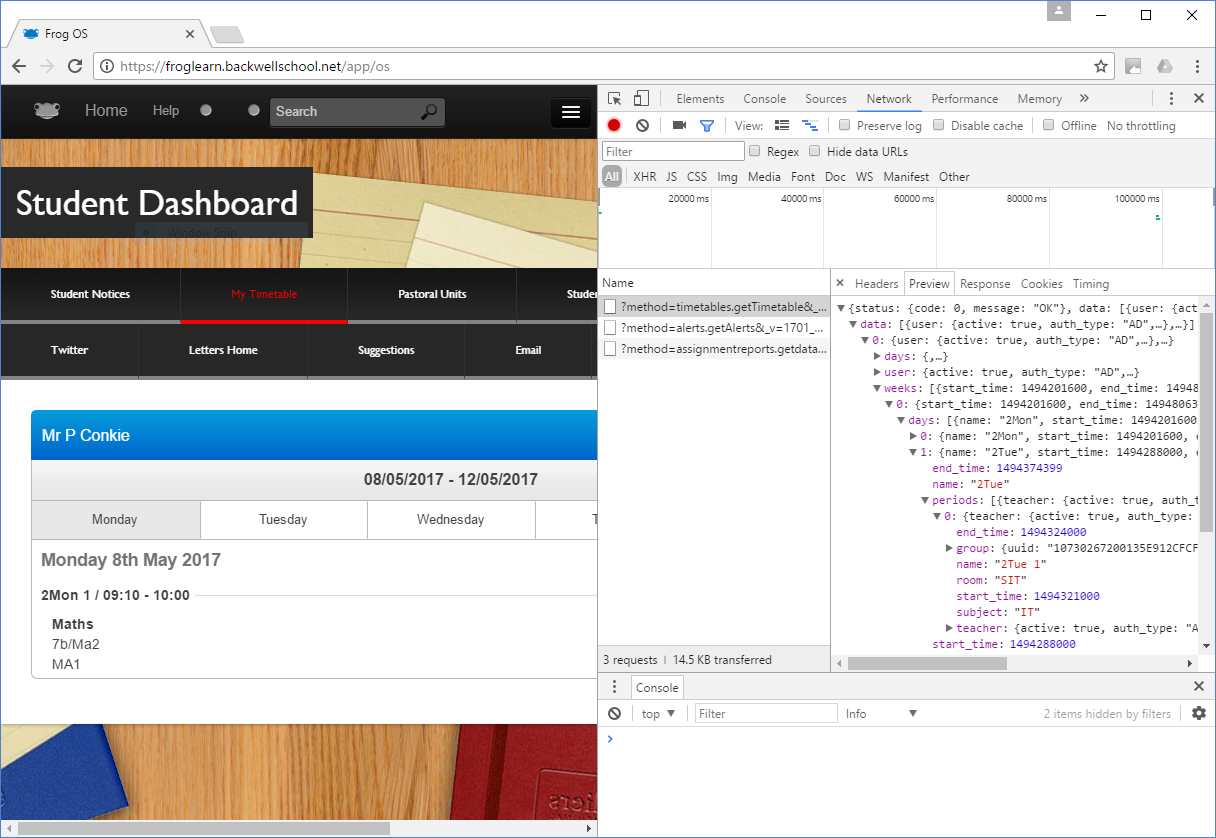
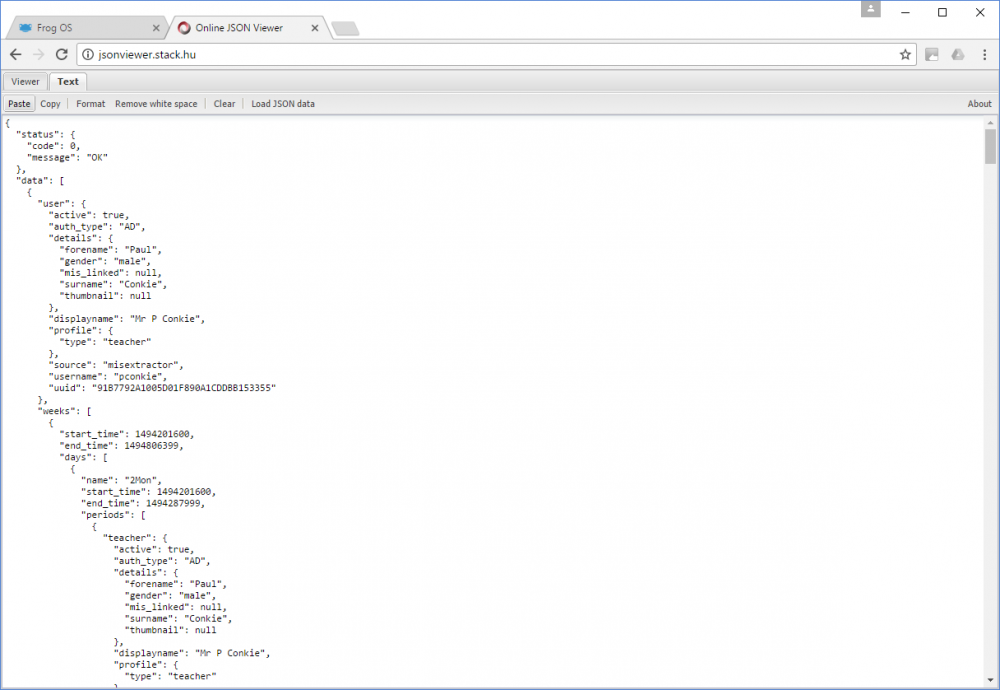
STEP 1: Analyse the frog timetable widget What information does it send and receive when it loads and as various parts of it are interacted with? How to do this is already explained on this forum (https://frog.frogcommunity.com/understanding-api), but in Chrome you can right click any element of the screen and select "inspect" (or ctrl+shift+I). This opens the Chrome Developer Tools (select the 'network' tab). You can see from the screen shot that as the widget loads it calls a frog api - timetables.getTimetable. This is a GET request (rather than a POST) which is important for any code that we will write. You can tell this because all of the parameters have been sent as a query string (if our parameters were contained in a form section then a POST would have been involved). The following parameters must be supplied with this call to timetables.getTimetable: 1. offset (number) - 0 = current week. Allows you to specify what week of timetable information you would like returned. e.g. 5 = 5 weeks in the future, -8 = 8 weeks in the past. 2. limit (number) - (use in conjunction with offset) the number of weeks of timetable data to return e.g. 3 = 3 weeks of data from the offset value is returned. 3. week_starts_on (number) - what should the first day of the week be? 1 = use Monday as first day of week. 4. user_uuid (string) - the id of the currently logged in user 5. target[] (array) - the id of the user whose timetable you want to look up. If omitted or left null the user_uuid is used for this purpose. Haven't tested, but assume you can supply more than one uuid. From using other examples on this forum here is a function for calling this api: var getTimetable = function(anyuuid) { Frog.Model .api( 'timetables.getTimetable', { limit: 2, offset: 0, week_starts_on: 1, //Monday user_uuid: currentuser.uuid, target: [anyuuid] //uuid for user we are looking up } ).done(function(thisResponse) { //error handling if (thisResponse.status.code == 0) { //more code here } }); }; //usage getTimetable(); //returns the timetable of the currently logged in user getTimetable('ABC12345'); //returns the timetable of the user with uuid ABC1234 Now back to Chrome to look at the structure of the data returned (preview tab). This is some highly nested JSON data. I find it useful to copy and paste it into a JSON viewer like this... The data section is of most interest. For each user whose timetable we are requesting (in our example just one) there is information about the user, the days in the timetable cycle and the timetable week (or weeks) requested. For each week there is information about the days in that week, the periods in that day and the group, room and teacher allocated to that period. That's USER->WEEK->DAY->PERIOD. If we want to display the timetable information for a day, we would need to select a day and loop through all of the periods. If we want to display the timetable information for a week we would need to select a week and loop through each day AND loop through each period. //this code inside the done() of the api call //would print details of every lesson in the entire response regardless of offset or how many weeks returned (limit) var data = thisResponse.data[0]; $.each(data.weeks, function(i,weeks) { $.each(weeks.days, function(p,days) { $.each(days.periods, function(q,periods) { console.log(periods.name+' '+periods.subject+' '+periods.teacher.displayname); }); }); }); //feels like there should be a better way of doing this? The frog timetable widget also uses a second api to search for other users and return their uuid. We will look at this call (textsearch.search) in step 2.


-
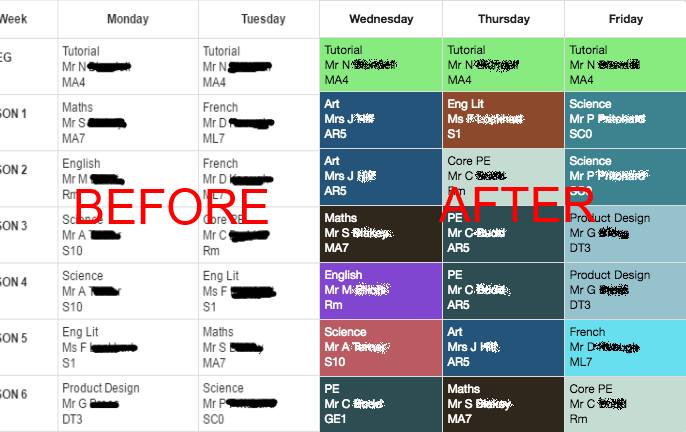
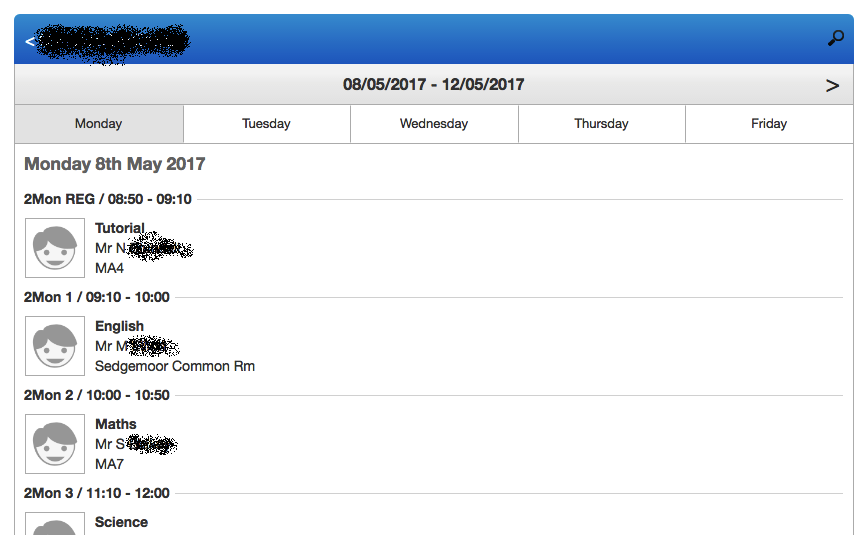
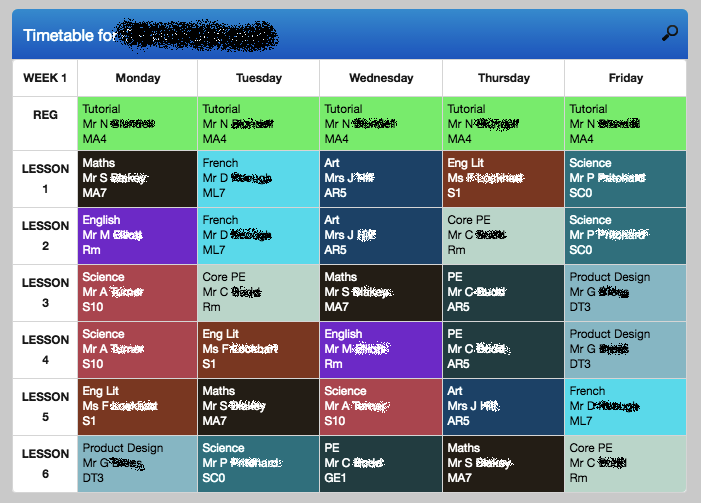
The frog timetable widget does the job..... But it's big, contains a lot of unused white space and you only get to see one day at a time. It's a matter of opinion, but we probably had more usable timetable widgets in earlier versions of frog. After spending the last week or so trying to get up to speed with FrogLearn development (thank you Graham and @Chris.Smith for your helpful and speedy responses!) I thought I would give re-designing this widget a go. Here is what I came up with.... As with the frog version you can lookup and display any student or teachers timetable. This version is much more compact, has a week to view, supports two week timetables and is a bit more 'colourful'. There are a few improvements that need to be made which i hope the community can help with, but i'm fairly pleased with the result and what is possible with the frog api's and built in access to jquery and bootstrap. I plan to share and explain my approach so that the code can be improved (i'm a science teacher with no formal coding training) and perhaps others will find it useful for their own projects?
-
Thanks again Chris, I must have checked that theme id ten times! All working great now. I like the alternative method above as it combines step 2a and 2b from my original post (and i don't need to pass a page uuid, which seems to be needed for sites.update) I know what you mean about async issues, ta. Paul
-
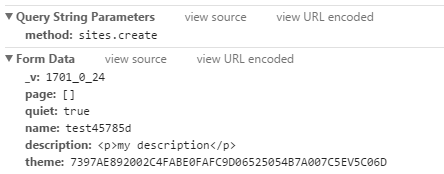
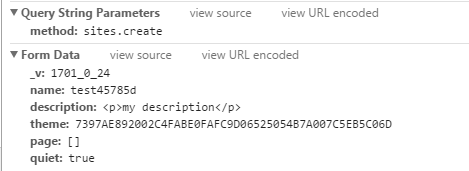
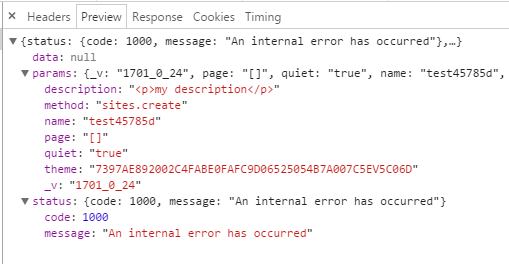
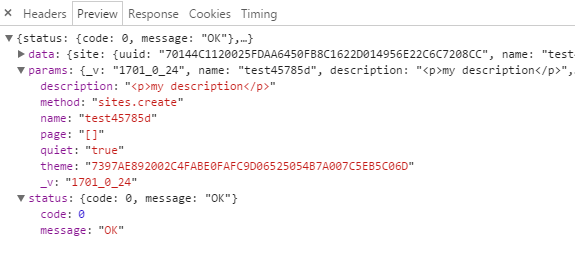
Actually - I still have no joy with this code...... It now posts the required parameters to the end point and I have what appears to be identical request headers, but the response returned is code: 1000 (An internal error has occurred). Left hand side is my code, right hand side is frog And the response (left my code, right frog).... I can't see a difference between the two. Is there another reason why code on a html widget might generate the error? Thanks Paul
-
Hi Chris Thanks for this pointer! And I think the link to the docs (that I had no ideas existed) will be extremely useful. Thanks Paul
-
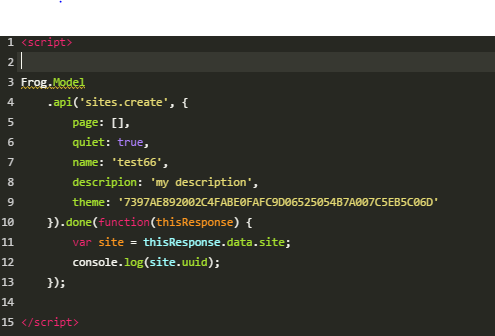
We are currently looking at how we could use assignments to better support learning. We are considering all staff using assignments in frog for some or all homework. I have been asked about the possibility of bulk assignment creation from excel or a google sheet (which is where details of homework are typically stored now). I think there are a number of steps needed to accomplish this... 1. Bring the external records into frog 2. For each record in turn a) create a site (sites.create) b) update the site (create a page to 'host' the assignment - sites.update) c) create an assignment using the site just created (assignments.create) Thanks to the tutorial on 'using firebase with frog' step 1 is done. Based on another tutorial on here: 'understanding frog api' I have made a start on step 2a. However, I believe that sites.create requires the form data to be POSTED rather than attached as a GET request. This would make it different to other Frog.model.api examples on this forum. I have been trying (unsuccessfully) variations to the code below to get the data "posted" to the end point. If this is the problem then can anyone shed any light on the correct syntax? Thanks
-
Thanks Graham. I must have a typo somewhere else then as I don't see anything in the console when this code runs. Most code examples on here use FrogOS.fdp, but this one uses Frog.Model.api. Is one approach legacy or is one better than the other? What is the difference between the HTML widget on a frog page and the new FrogCode that has appeared in my frogdrive?
-
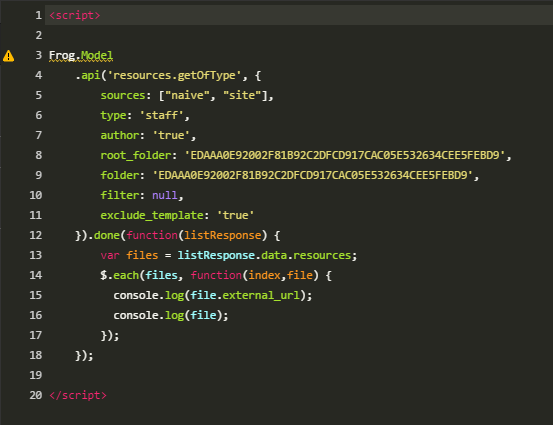
Hi Graham Is there anything I need to do that isn't mentioned in your understanding api tutorial? I have copied the code below but get an error on line 3 - 'Frog is not defined'. Any ideas?